

How To Transfer A Drawing To Fabric
6 Means to Transfer your Embroidery Design to Fabric

In that location are a multifariousness of techniques to transfer an embroidery or needlepoint blueprint to fabric. Select the one that will work the best for the complexity of your design and the color and texture of your cloth.
Here are half dozen ways to transfer your embroidery pattern to fabric.

one. Trace using window or light box
This is my favorite method if the fabric is light weight enough to see the design to trace, using a Frixiron pen to trace the design onto my textile. Here is how to trace an embroidery design on fabric using a window or light box:
- Tape your design on a window or calorie-free box using painters tape.
- Lay your textile over your design and tape it so that it doesn't shift while you are tracing information technology.
- TIP: Painters record works best because it doesn't leave a glutinous residue on your material and it easily comes off of the paper.
- Trace your design to your cloth.
- Use a Frixion pen to trace and it volition requite you a nice sharp line for your embroidery. If you oasis't used these pens, try them. You can make a marker on the material, and when yous are ready for the marks to be gone, merely iron them away. Make sure to exam on a corner of your fabric earlier transferring the design and stitching.
Some people prefer the h2o soluble pens to mark their material, where the marks erase when the cloth is wet with cool water. Estrus volition set these marks, so keep away from oestrus until your embroidery dries naturally.
ii. Fe On rut sensitive pens or pencils
Using an atomic number 26 on heat sensitive pen or pencil is an piece of cake method for unproblematic designs you trace or freehand. The atomic number 26 on estrus sensitive pens don't give a real sharp line, so they are better for embroidery designs without a lot of fine detail.

- Impress or describe your embroidery design on paper.
- Trace or draw the around entire design with the special heat sensitive pen or pencil straight on the newspaper.
- Follow the directions for your pen or pencil to transfer the design to your fabric with an iron.

- If your design has a direction, when you turn the paper over to transfer the blueprint to the fabric, it will be reversed. Instance, if the design has words, they will exist reversed. If y'all want it a specific direction, trace the design on the back of the printed pattern, or utilise a calculator program to reverse the design earlier printing.

This method works well on heavier fabrics that light does not polish through with a low-cal box or taping to a window. Bank check your product considering the pattern may be permanent on your cloth. And so don't use with nice lines or stitches that testify the line, similar the Daisy Stitch. This method is better for fill embroidery stitches similar satin sew, or heavier line stitches like the chain stitch.
3. Tracing Paper
Using tracing paper for an embroidery design is a nifty way to mark larger sections on your fabric for make full or outline embroidery. It's not the all-time style to transfer modest details or designs. It's perfect if you want to freehand stitching with some basic lines, like baste some hills on a mural design that you freehand in dissimilar stitches and colors to consummate the project. You stitch through the paper, and then demand to remove the paper.
- Trace your pattern onto tracing newspaper using any pencil or pen.
- Identify your tracing paper on your fabric and baste through the design lines on your textile. The basting lines get your embroidery pattern on your cloth.
- Once the unabridged pattern is basted, carefully remove the tracing paper. At present your design is ready for stitching.
- Follow your loose basting lines for your design.
- When y'all are finished with your embroidery pattern, advisedly remove the basting lines.
This method works well on textured or thick fabrics that are hard to mark with any of the to a higher place methods, or when y'all want to sketch in outlines to freehand your stitches with a little chip of guidance.
4. Water-Soluble Stabilizer

This is a great selection for embroidery designs with a lot of detail. All you do is put the water soluble stabilizer through your printer or re-create your design using your printer. All of the piddling details are ready for you lot to stitch and you don't need to trace or practice anything!
There are many different water soluble stabilizers. Some may be 'sticky' to your needle, and so be prepared. I keep a used dryer canvas handy to clean my needle if information technology gets goopy from the gummy from the stabilizer. Also, the finished embroidery is raised a little flake, due to the layer of stabilizer betwixt your thread and fabric while stitching, on some designs I like the extra dimension on the finished embroidery.

- Print your embroidery design design directly on the stabilizer.
- Baste the stabilizer to your textile before hooping, with the stabilizer on acme of the right side of your cloth.
- Run up through the stabilizer and fabric, using the pattern printed on the stabilizer.
- When completed, cut away excess stabilizer. This doesn't demand to be perfect, only makes it easier to get all of the stabilizer off of your finished piece if you accept this little fleck of time to remove the excess.
- Soak your piece to remove the remaining stabilizer, co-ordinate to the manufacturer'due south directions.


This method is not bad for very intricate designs and fabrics that are hard to mark with other methods. The fabric and threads must be washable, and non drain. We recommend testing all of your threads and fabric before trying this method. You'd hate to take something run and ruin your work.
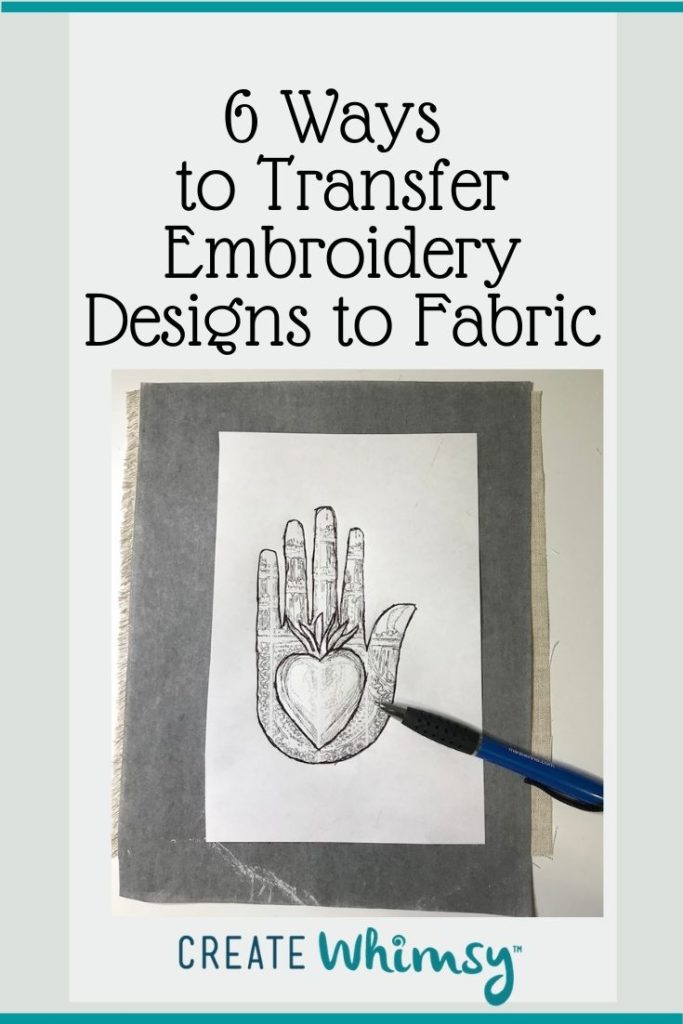
5. Transfer Paper
Transfer paper is a great solution for detailed embroidery designs. Transfer papers come up in a multifariousness of colors, and most marks are easily removed with an eraser or damp fabric. E'er test on a corner of your textile earlier transferring your design.

- Identify your cloth on a hard surface.
- Place the embroidery transfer paper on top of your material, with the transfer side downwards.
- Then place your blueprint on height of the transfer newspaper.
- I similar to use painters tape to tape each layer down and then they don't shift while I'one thousand tracing. The painters tape is easily removable only keeps everything secure.
- Trace around your pattern using a pen or stylus with moderate pressure to transfer the pattern to your fabric. I find that I need to go over each line several times with moderate pressure to go a good transfer. If you put too much pressure, it tears your paper and through the transfer paper. (Every bit me how I know!)
- Advisedly remove each layer and the painters record.
- Have fun stitching!

This method works well with thicker fabrics where the lite method doesn't work, but non ones with a lot of texture. Besides, you can purchase transfer paper in a variety of colors, so information technology works well with dark fabrics.
half dozen. Printer Ink
Many ink jet printer inks can be transferred to cloth or another surface with heat. I haven't been every bit successful with toner ink. This is probably my least successful method. It works best if you try the heat transfer correct afterwards the newspaper is printed, while the ink is fresh.
- Print your pattern using your printer.
- Identify the ink side of the paper to the right side of your material. This will opposite your image, so use a symmetrical pattern. If your blueprint has text, you will desire to reverse the epitome before printing.
- Press with a hot, dry atomic number 26. Carefully pull up an edge to run across if the pattern has transferred trying not to shift the fabric or newspaper.
Note: Test this. Not all printer inks work. Also, sometimes information technology is a very faint line.
You lot'll find favorite methods for dissimilar types of projects and fabrics. Most of all, have fun stitching!
Browse through all of the embroidery projects and inspiration on Create Whimsy.


Source: https://createwhimsy.com/projects/6-ways-to-transfer-your-embroidery-design-to-fabric/
Posted by: holtzdestoo92.blogspot.com
0 Response to "How To Transfer A Drawing To Fabric"
Post a Comment